{Hope you ALL have a fabulous Memorial Day weekend!}


For this project you will need the following materials:
* A 24″ square pillow form. (A smaller pillow can be used but you will have to adjust the templates accordingly. )
* A 24″ square solid color pillow cover (a felt cover would be optimal).
[Instructions for making this pillow cover are posted here]
* White felt, at least 22 inches square (or another color of your choice)
* Fuchsia felt, at least 10 inches square (or color of your choice)
* Pink felt, at least 10 inches square (or color of your choice)
* Yellow felt, about 10 inches square. (or color of your choice)
* Fabric glue (fusible web interfacing can be used as an alternative)
* A piece of paper at least 22 inches square.
Steps
Center the medium (pink) suzani flower in the center of the large (fushia) suzani flower and adhere with fabric glue.


Allow the glue to dry.
Set the pillow up to see if any edges need more glue.
You are finished. Enjoy your custom pillow!


What you’ll need:
- 1/2 yard of white or ivory lace (can do variations with any style/color fabric, or purchase vintage lace tablecloth)
- Thread and needle
- Hot glue gun
- Scissors
- A little bit of white or ivory felt.
- Vintage earrings or brooches
- Needle-nosed pliers
- Any pair of shoes that need a little dressing up!
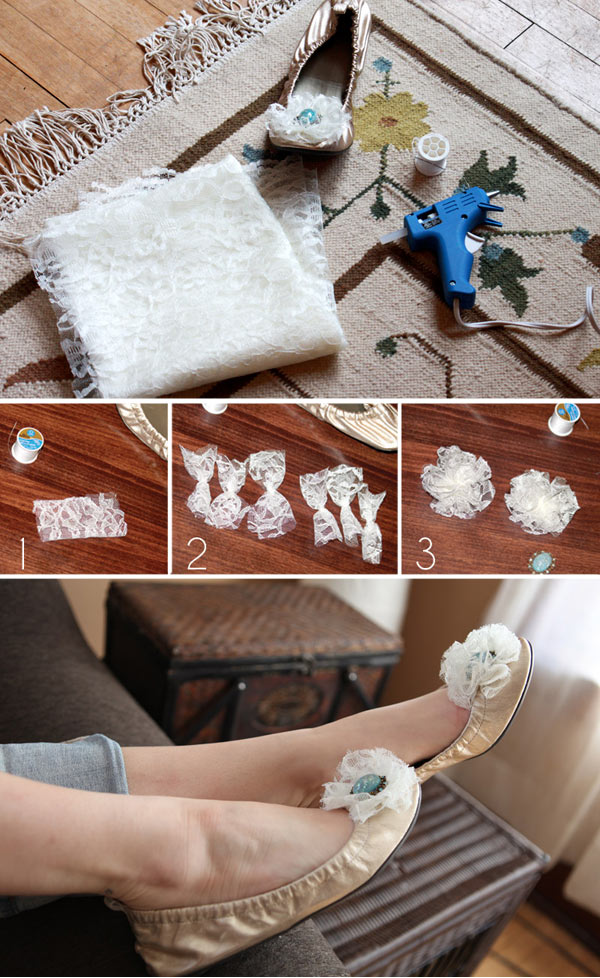
Instructions:
Step 1: Cut the lace into pieces that measure approximately 3 inches long by 2 inches wide. You can play around with these sizes to make fabric flowers bigger or smaller, as desired. You will need about 6 of these per flower, 12 total.
Step 2: Fold the pieces in half and tie some thread around the middle and secure with knot.
Step 3: Take one of fabric pieces and place on top of another one, middles together, and perpendicular to each other, forming an X. Take needle and thread and put a could stitches through where the middles meet. Once you’ve got it secure, add another fabric piece in the same manner, filling in the holes, and add a few more stitches. Do this until all fabric pieces are used. Fluff the newly formed flower. Repeat for second flower.
Step 4: Take the scissors and trim the edges of the flowers, creating a rounded shape. Trim off any stray pieces.
Step 5: Cut out two pieces of felt about the size of a quarter, and glue to the bottom of your flowers, for extra hold.
Step 6: Use the needle nosed pliers to remove the back fasteners of the earrings. The ones I used were clip on’s so I had to remove the clip part. If they are regular earrings, you may have to clip off the point. Be careful not to damage the jewelry too much.
Step 7: Put a nickel sized dollop of hot glue on the back of the earring, and place firmly in the middle of the fabric flower. Hold for a few seconds, and then set down face up to make sure it dries in the right place. Repeat for each flower.
Step 8: Glue each flower to the top of each shoe. Press firm, let dry. Once the glue is dry, you can put a couple discreet stitches through the flower into the shoe, for extra hold. Be sure to start from underneath, so the thread knot doesn’t show.