

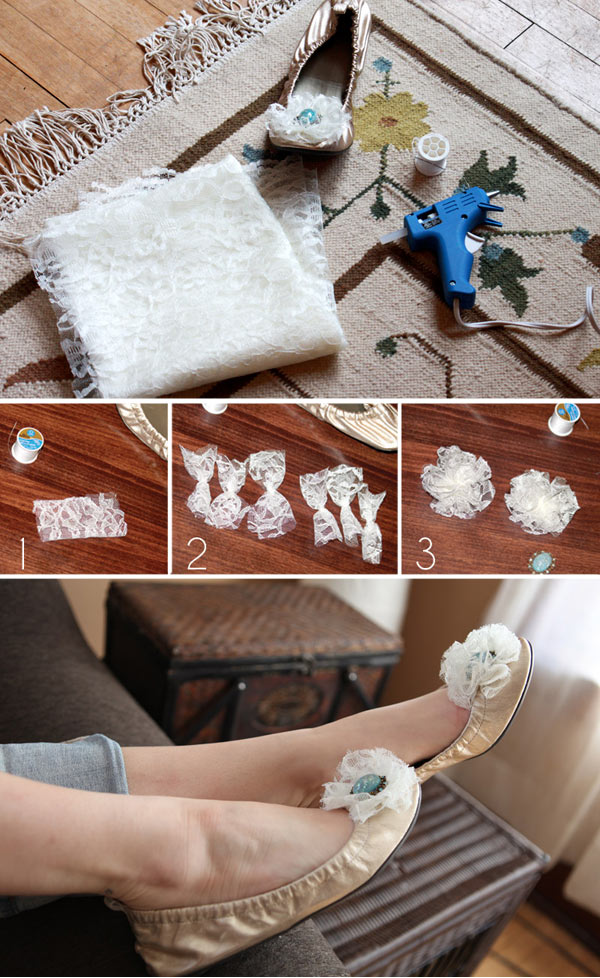
What you’ll need:
- 1/2 yard of white or ivory lace (can do variations with any style/color fabric, or purchase vintage lace tablecloth)
- Thread and needle
- Hot glue gun
- Scissors
- A little bit of white or ivory felt.
- Vintage earrings or brooches
- Needle-nosed pliers
- Any pair of shoes that need a little dressing up!
Instructions:
Step 1: Cut the lace into pieces that measure approximately 3 inches long by 2 inches wide. You can play around with these sizes to make fabric flowers bigger or smaller, as desired. You will need about 6 of these per flower, 12 total.
Step 2: Fold the pieces in half and tie some thread around the middle and secure with knot.
Step 3: Take one of fabric pieces and place on top of another one, middles together, and perpendicular to each other, forming an X. Take needle and thread and put a could stitches through where the middles meet. Once you’ve got it secure, add another fabric piece in the same manner, filling in the holes, and add a few more stitches. Do this until all fabric pieces are used. Fluff the newly formed flower. Repeat for second flower.
Step 4: Take the scissors and trim the edges of the flowers, creating a rounded shape. Trim off any stray pieces.
Step 5: Cut out two pieces of felt about the size of a quarter, and glue to the bottom of your flowers, for extra hold.
Step 6: Use the needle nosed pliers to remove the back fasteners of the earrings. The ones I used were clip on’s so I had to remove the clip part. If they are regular earrings, you may have to clip off the point. Be careful not to damage the jewelry too much.
Step 7: Put a nickel sized dollop of hot glue on the back of the earring, and place firmly in the middle of the fabric flower. Hold for a few seconds, and then set down face up to make sure it dries in the right place. Repeat for each flower.
Step 8: Glue each flower to the top of each shoe. Press firm, let dry. Once the glue is dry, you can put a couple discreet stitches through the flower into the shoe, for extra hold. Be sure to start from underneath, so the thread knot doesn’t show.


No comments:
Post a Comment